
Custom Vinyl Decal Decor Ideas for a Cozy Home
Table of Contents
- Why Custom Vinyl Decal Decor Is Everywhere in 2026
- 10 Custom Vinyl Decal Decor Ideas That Feel Like Home
- The Best Surfaces for Vinyl Decals (and How to Prep Them)
- How to Apply Vinyl Decals to Wood Without Bubbles or Peeling
- What You'll Need
- Step 1: Clean and Seal the Wood [Time: 5 minutes]
- Step 2: Position with Painter's Tape [Time: 5 minutes]
- Step 3: Burnish from the Center Out [Time: 10 minutes]
- Step 4: Peel the Transfer Tape Slowly [Time: 5 minutes]
- Vinyl Decal Removal Tips That Protect Your Paint and Finish
- Design Mistakes That Make Decals Look Cheap
- Frequently Asked Questions
Last Updated: September 13, 2026
Why Custom Vinyl Decal Decor Is Everywhere in 2026
The global vinyl sticker market hit $0.62 billion in 2026 and is projected to reach $1.01 billion by 2035, a 5.5% compound annual growth rate, according to Business Research Insights market report. That growth reflects something quieter happening inside homes: people want spaces that feel personal without a renovation budget. Custom vinyl decal decor ideas fill that gap, turning blank walls, plain jars, and bare laptop lids into small expressions of identity.

At Stoney's Creations, the studio's handmade vinyl work is rooted in mountain and forest imagery, and customers keep asking for the same thing: warmth that doesn't look mass-produced.
What makes vinyl decals so appealing right now? They're affordable, removable, and endlessly customizable. Printful's 2026 sticker trend guide identified 43 distinct design directions gaining traction this year, from BookTok-inspired quotes to retro Y2K aesthetics (printful.com). But before you order anything, it helps to understand which surfaces work, how to apply decals cleanly, and what separates a polished look from a peel-and-stick mess.
10 Custom Vinyl Decal Decor Ideas That Feel Like Home
The strongest decal projects start with a room's mood, not a design catalog. Vinyl Decal School's 2026 analysis of best-selling decals found home organization is a top-performing category, with pantry labels, bin stickers, and custom shampoo and conditioner bottle labels driving steady demand (vinyldecalschool.com). Here are ten directions that work in real homes.
- Pantry and spice jar labels with clean serif lettering
- Laundry room sorting labels for baskets and detergent bins
- Nursery name decals above a crib or on a bookshelf
- Growth chart rulers applied to a hallway wall
- Kitchen backsplash quotes in matte finish
- Home office motivational lettering above a desk
- Front door welcome decals with family names
- Car window decals for personal expression on the road
- Laptop and water bottle decals for everyday carry
- Bathroom jar labels for cotton balls, bath salts, and soaps
Each works best when the design stays simple. That's a recurring theme across the ideas below.
Rustic Kitchen and Pantry Labels
Kitchen decals succeed when they disappear into the room's existing style rather than shouting over it. Warm wood tones pair well with matte black or cream lettering, while modern kitchens handle thinner sans-serif fonts. Vinyl Decal School notes pantry labels and bin stickers remain among the highest-demand decal applications heading into 2026, and it's easy to see why: a labeled jar costs a few dollars and looks intentional.
For a cohesive set, pick one font family and two colors maximum. Mixing script and block lettering across a shelf creates visual noise.
Nursery Wall Art and Kids' Room Themes
Nursery decals offer the biggest visual payoff for the smallest spend. A name decal above a crib or a row of forest animals along a wall transforms a plain room in under an hour. Printful's 2026 trend roundup points to adorable pets as one of the most popular themes for custom sticker and decal designs this year, alongside retro Y2K aesthetics.
Parents should prioritize removable adhesive for nursery applications. Walls get repainted, furniture gets rearranged, and a decal that lifts cleanly saves hours of scraping later.
Vehicle Windows, Laptops, and Everyday Carry
Personal expression travels well. CarStickers identified four dominant 2026 design themes, including "Wellness Wears Off," "The AI Identity Crisis," and "Perfectly Imperfect Design," all of which show up on car windows, laptops, and water bottles. The 4over4 industry report confirms the sticker and label market is heavily driven by decorative segments like die-cut vinyl, window graphics, and laptop decals.
For vehicles, choose UV-resistant, weatherproof vinyl. Standard indoor vinyl will fade and crack within months on a car window.
The Best Surfaces for Vinyl Decals (and How to Prep Them)
The best surfaces for vinyl decals are smooth, non-porous, and completely clean: glass, sealed wood, painted drywall, metal, and plastic. Textured or freshly painted surfaces cause the majority of adhesion failures.
Why smooth wins comes down to surface energy and contact area. Pressure-sensitive adhesive needs the vinyl to wet out across the full surface, and a glossy, high-energy surface like glass lets the adhesive flow into every microscopic valley. A low-energy surface like untreated polyethylene or a matte-textured wall leaves air channels under the film, which is where lifting starts. That is the mechanism behind almost every "my decal peeled" complaint.
Surface-by-Surface Prep Guide
| Surface | Prep Step | Cure Time Before Applying | Adhesion Quality |
|---|---|---|---|
| Glass | Wipe with isopropyl alcohol | None | Excellent |
| Sealed wood | Dust, then wipe with a damp cloth | 24 hours after sealing | Good |
| Painted drywall | Let paint cure fully | 2-3 weeks | Good |
| Metal | Degrease and dry | None | Excellent |
| Plastic | Wash with mild soap | None | Varies by plastic type |
| Textured walls | Avoid, or use high-tack vinyl | N/A | Poor |
A common mistake is applying a decal to a wall painted yesterday. Fresh paint releases solvents for weeks, and the adhesive traps them, which leads to bubbling and peeling. Most painters recommend waiting the full cure window printed on the can, usually two to three weeks for interior latex, before any film touches the wall.
Cleaning and Maintaining Vinyl Decals So They Last
This is the step almost every guide skips, and it is the single biggest factor in whether a decal survives two years or two months.
- Dust first, always. Wipe with a dry microfiber cloth before any liquid touches the vinyl. Grit dragged across the surface micro-scratches the film.
- Use mild soap and water. A drop of dish soap in a spray bottle is enough. Avoid ammonia-based glass cleaners and anything with alcohol on printed or glitter vinyl, they dull the finish and can lift edges.
- Skip the abrasive side of the sponge. Soft cloth only. Scouring pads shred the topcoat.
- Watch the edges. Edges are where failure begins. If a corner lifts, press it back down with a felt squeegee while the surface is warm.
- Keep decals out of direct, sustained sun where possible. UV is the main cause of fading, and it hits vehicle decals hardest.
- Re-burnish seasonally. Once or twice a year, run a squeegee over the decal from the center out. It reseats the adhesive and catches lifting before it spreads.
How to Apply Vinyl Decals to Wood Without Bubbles or Peeling
Applying vinyl decals to wood without bubbles comes down to three things: a clean sealed surface, steady pressure from the center outward, and patience with the transfer tape. Wood is trickier than glass because it's porous, so sealing first is not optional.
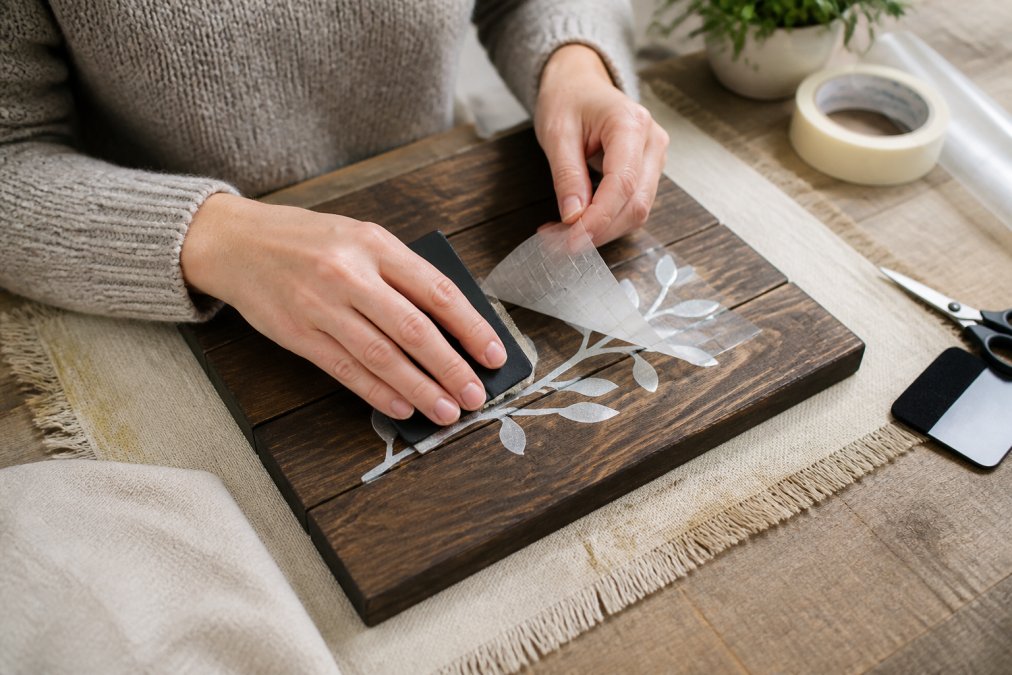
Total Time: 20-30 minutes Difficulty: Beginner
What You'll Need
- Sealed wooden surface
- Vinyl decal with transfer tape
- Felt-edged squeegee
- Isopropyl alcohol and a lint-free cloth
- Painter's tape
Step 1: Clean and Seal the Wood [Time: 5 minutes]
Wipe the surface with isopropyl alcohol and let it dry completely. The wood must already be sealed and fully cured.
Expected Result: A dust-free, smooth surface with no tacky spots.
Step 2: Position with Painter's Tape [Time: 5 minutes]
Tape the decal in place and step back to check alignment before removing any backing.
Expected Result: The decal sits level and centered where you want it.
Step 3: Burnish from the Center Out [Time: 10 minutes]
Peel back a small section of backing and press the decal down with the squeegee, working from the middle toward the edges.
Expected Result: The vinyl sits flat with no trapped air pockets.
Step 4: Peel the Transfer Tape Slowly [Time: 5 minutes]
Pull the transfer tape back at a low angle, close to the surface. If vinyl lifts with it, press it back down and repeat.
Expected Result: The decal remains on the wood and the transfer tape comes away clean.
Skipping the sealing step on bare wood is the single most common cause of peeling decals. The adhesive bonds to wood fibers instead of the surface, and the decal lifts within weeks.
Vinyl Decal Removal Tips That Protect Your Paint and Finish
Vinyl decal removal tips that protect your finish all follow one principle: heat softens, patience wins. Ripping a decal off cold is how paint comes with it.
Warm the decal with a hairdryer on low for 30 to 60 seconds, then peel from a corner at a shallow angle. Adhesive residue left behind comes off with isopropyl alcohol or a dedicated adhesive remover. On painted walls, aim the heat at the vinyl, not the paint, and never use a metal scraper.
For car windows, park in the sun for 20 minutes first. The heat does most of the work.
Troubleshooting the Five Most Common Decal Failures
Most how-to guides stop at "apply it carefully." Here is what to do when it goes wrong, because it will.
Air bubbles. Small bubbles often disappear on their own within a few days as the adhesive outgasses. For stubborn ones, prick the bubble with a pin at a shallow angle, then smooth it flat with a squeegee. Never slice a bubble open with a blade, you will cut the vinyl, not just the bubble.
Lifting edges. Press the edge back down with a felt squeegee while warming it gently with a hairdryer. If it lifts again within a day, the surface was likely not clean or not cured. Clean the edge with isopropyl alcohol, let it dry, and re-press. For a permanent fix on a wall, a tiny dot of clear-drying craft glue under the lifted corner works, but it makes future removal harder.
Wrinkled or stretched vinyl. This usually happens when transfer tape is peeled too fast or at the wrong angle. Once vinyl stretches, it does not recover. The fix is to remove the decal and start over with a fresh piece, this is why ordering a spare is worth it.
Adhesive residue after removal. Warm the residue with a hairdryer, then roll it off with your thumb or a piece of tape. Isopropyl alcohol handles the rest. On painted walls, test any solvent in an inconspicuous spot first, because some paints soften under alcohol.
Decal pulled paint off the wall. This is the failure nobody wants. It happens when the wall was not fully cured, when the decal sat for years, or when it was removed cold. The repair is a patch and repaint, there is no shortcut. Prevention is the whole game: cure time, gentle heat, and a slow peel.
Never use a razor blade, metal scraper, or steel wool on painted surfaces or vehicle clear coat. The scratch you create will cost far more to fix than the decal cost to buy.
Design Mistakes That Make Decals Look Cheap
Complexity is the fastest way to make a decal look cheap. Center City Print's 2026 guidance warns that excessive fonts or colors create visual clutter and undercut the decor's impact. The same principle applies whether you're labeling pantry jars or decorating a nursery wall.
- Mixing more than two fonts
- Using gradients on small decals
- Choosing glossy finish for textured surfaces
- Placing a large decal in a small space
- Skipping surface prep entirely
Stoney's Creations builds each custom vinyl decal to order, so you can send a reference photo, a rough idea, or just a vibe, we'll create custom artwork or work from your own design file. The studio's custom vinyl decals and stickers start at $6.00 and come in multiple colors, patterns, and finishes, including glitter, holographic, kaleidoscope, and glow in the dark.
Frequently Asked Questions
What are the best surfaces for applying custom vinyl decals?
Smooth, clean, non-porous surfaces hold vinyl decals best: painted drywall, glass, metal, sealed wood, plastic, and laminate. The global vinyl sticker market reached $0.62 billion in 2026 (Business Research Insights), and most failures trace back to porous or dirty surfaces. Avoid raw brick, unsealed concrete, and heavily textured walls unless you use a specialized high-tack adhesive. Always wipe the surface with rubbing alcohol and let it dry completely before applying.
How do you remove vinyl decals without damaging paint?
Warm the decal with a hair dryer on low for 30 to 60 seconds, then peel slowly from a corner at a sharp angle. For stubborn adhesive residue, apply a small amount of rubbing alcohol or warm soapy water and scrape gently with a plastic card. Never use a metal scraper on painted walls or car panels. If the decal has been in place for years, work in sections and reheat as needed to keep the vinyl flexible.
Can custom vinyl decals be used on textured walls?
Standard adhesive vinyl struggles on textured walls because the adhesive cannot fully contact the surface. For orange-peel drywall or light stucco, choose a high-tack or low-surface-energy vinyl, press firmly with a squeegee, and expect a shorter lifespan. For heavy textures like brick or rough plaster, consider a window cling or a framed decal instead. Smooth painted walls remain the most reliable option for long-term vinyl decal decor.
How long do custom vinyl decals last indoors and outdoors?
Indoor decals on smooth surfaces typically last 3 to 5 years, while outdoor decals with UV-resistant laminate can hold up 5 to 7 years. Home organization labels, a top-selling vinyl category in 2026 (Vinyl Decal School), often outlast the containers they sit on. Direct sunlight, humidity, and frequent washing shorten lifespan. Matte finishes hide scratches better than glossy ones, and weatherproof vinyl is essential for car windows and mailboxes.
Decorating with vinyl isn't about covering every surface. It's about choosing a few spots where a small, well-placed detail makes a room feel like yours. If you'd rather skip the guesswork, Stoney's Creations offers made-to-order custom vinyl decals with your choice of colors, finishes, and artwork, plus handmade rustic pieces that carry the same mountain-and-forest warmth into your home. Shop now and bring a little of that quiet, nostalgic beauty into your space.